


What this is about?
This is a blog about mTLS concepts. We will journey through a practical walkthrough on how to setup mTLS from scratch using OpenSSL, Nginx, and using the command line.
I'm writing this blog for two reasons:
I've interacted a lot of people who are not fully versed with this concept - from students, to security professionals working in large banks. There are gaps in understanding.
I did not find all of this information in one place on the internet
Pre-requisite knowledge
This article assumes you understand a bit about PKI, certificates, encryption, basic shell commands and such. These are not complex things - you could read about them from pretty much anywhere, but I'll be happy to expand this section and link some helpful articles to learn about these pre-requisites.
Some basics
Mutual TLS, or mTLS for short, is a method for mutual authentication. mTLS ensures that the parties at each end of a network connection are who they claim to be.
First let's get things straight. mTLS comprises of two mutually exclusive components. One is the server side, and another is the client side. Both of them are independent and do not need to interact with each other in any way. It is important to understand this because what this means is that the server side SSL can have a different set of certificates, from one CA, and the client side certificates can be from a different CA.
Server side
Whenever we visit a website with 'https' in the URL, we are using server side TLS. That means the server sends us it's certificate. We verify the server certificate authenticity because our browser comes packed with a bunch of root certificate stores. In layman terms that means your browser comes built in with the ability to know who to trust. You shouldn't add anything in here unless you absolutely know what you're doing. Go to your browsers certificate management settings to take a look at this now, in case you already haven't. Remember to never import a trusted certificate without really understanding what you're doing.
Client side
Client side TLS is not normally used when we visit a site beginning with 'https'. In this method, some special settings are made on the server, which tell the server to look for client certificates along with the requests, and then authenticate those requests based on the validity of the client certificate. We will understand more as we dive into the practicals below.
Practicals
Goal
We have to host a website called 'example.com'. The homepage contains some super-secret information that we don't want accessible to the public internet. Only people who are authorised to access it must be given access. We will provide these special people with a certificate that we issue, in order for them to present to our server to verify their identity. We will create the SSL certificate for the website using LetsEncrypt's CA, and then create our own CA for issuing the client side certificates. The server will maintain a certificate revocation list to ensure that we have absolute control over who gets to access our super-secret information.
Why the hell not just use authentication?
If you've asked this question - good. mTLS does have it's costs. It does take up CPU time - because TLS is an expensive operation. It is not cheaper than using JWT or authentication headers to authenticate at the application level. There are, however a few scenarios where mTLS is useful:
- Machine talk : IoT devices, automated scripts/applications, and other such mechanical clients sometimes cannot deal with the complexities of Oauth2 or other flows. In such cases, providing them with a certificate.
- Multi-factor : In some applications such as finance, banking and other Critical Information Infrastructure, the cost of mutual TLS is acceptable given the risk and the security requirements. In such cases, mTLS becomes an additional factor of security in addition to - say, VPN tunnels, HTTP headers, OAuth, Logins with Passwords etc.
I hope you get the idea; it's an additional layer of security. I also like to use it when hosting internal applications on the internet. Sometimes we setup company intranet tools for roadwarriors to access. The traditional way would be to get them to VPN into our network, and then access the application - however that is not an entirely scalable solution - to have a bottleneck at the VPN. Especially in a cloud world, this is not the best architecture. In such scenarios, every member of the company can be provided with their own certificate, and mTLS can be used on the load balancer/reverse proxy that sits in front of the (internal company) application which is then hosted on the public internet. However our internal application is now protected using mTLS, so any requests coming from the internet that do not carry the certificate, are simply dropped by the reverse proxy/load balancer - thereby protecting our precious app from the evil onslaught of the omnipresent bots that spray their evil payloads across webservers around the world. (for those unacquainted - go start a webserver on a publicly hosted VPS, and watch your access logs after 15 mins. You'll see unholy strings appear from the dark recesses of the internet. Better still, enable POST request logging and you will witness yet-unholier things).
Ok - now that we've got the goals out of the way, let's do this!
Disclaimer
 Use this information entirely at your own risk; chances are that it's perfect and you'll be absolutely fine, however if you're not sure of what you're doing - and you're copy-pasting commands from here to protect that critical server that's handling transfer of finances in your company, or perhaps protecting that API that governs physical processes in your chemical plant - you should definitely call in a professional who's done this before. The OpenSSL framework can be slightly complex to the un-initiated, and although it's best to learn hands-on, there are many ways to shoot yourself in the foot. You're entirely responsible for your own actions from here on.
Server side
Let's assume we're running a Debian/Ubuntu distro to make life easy to start out with. Once you get the basics right you can replicate it on any distro of choice. Get your box up and running. We're assuming it's on the public internet here and you have nginx installed. The nginx conf file below should shed some light on the setup.
    server {
        server_name   example.com www.example.com;
        listen   80;

        error_page    500 502 503 504  /50x.html;

        location      / {
            root      /var/www/html;
        }

    }
If you're having trouble understanding what the above is about, you should read up about nginx and the format of the config files. The above file should be saved as a '.conf' and put into the 'sites-enabled' folder (preferably via a softlink from the sites-enabled folder - however that's just convention, do as you like).
Make sure that your domain name(s) is/are pointing to your public IP - check your DNS Zone file. Check that everything is ok with nginx by running:
$ sudo nginx -t
Now re-load nginx
$ sudo systemctl reload nginx
You should now be able to access example.com from any browser on the internet. The index.html should be served containing our supposed super-secret-information.
Ok great. This is good, however we need SSL else everyone can read our requests to our super-secret information, and the super-secret information itself as it transits over the wire over the internet. Let's fix that.
You'll need to install certbot with the nginx plugin. Certbot is the wrapper that interfaces with LetsEncrypt's API's and obtains a certificate. If you're hardcore and believe that python wrappers around API's are for accountants(no offense to accountants here - your job is not to obtain SSL certificates), and that real professionals must speak HTTP with their bare fingers, then knock yourself out, RTFM and do it; this tutorial is for beginners, so I'm sticking with the wrapper. Let's get it installed like so.
$ sudo apt install certbot python3-certbot-nginx
After installing it, go ahead and obtain your SSL certificates. The certbot tool, in the background basically requests for the certificates, downloads them, and edits the nginx conf file to point to the certificates and (optionally) redirect all HTTP requests to HTTPS. If you're hardcore and want to do some, or all of this manually (I'd encourage this as a learning process) then please figure it out and do it. We're taking the simple route here so do this now.
$ sudo certbot --nginx -d example.com -d www.example.com
Follow the prompts and setup the redirect. If you now go ahead and look inside your nginx conf file as mentioned earlier, you'll see something a bit different!
server {

    server_name example.com www.example.com;
    location / {
        try_files $uri $uri/ =404;
    }


    listen [::]:443 ssl; # managed by Certbot
    listen 443 ssl; # managed by Certbot
    ssl_certificate /etc/letsencrypt/live/example.com/fullchain.pem; # managed by Certbot
    ssl_certificate_key /etc/letsencrypt/live/example.com/privkey.pem; # managed by Certbot
    include /etc/letsencrypt/options-ssl-nginx.conf; # managed by Certbot
    ssl_dhparam /etc/letsencrypt/ssl-dhparams.pem; # managed by Certbot


}


server {
    if ($host = www.example.com) {
        return 301 https://$host$request_uri;
    } # managed by Certbot


    if ($host = example.com) {
        return 301 https://$host$request_uri;
    } # managed by Certbot


    listen 80;
    listen [::]:80;

    server_name example.com www.example.com;
    return 404; # managed by Certbot


}
Alright - reading the above config should be self-explanatory. Now if we try to visit example.com, we should be redirected by our browsers to example.com. This is great. Now all of the data between us and the server will be fully encrypted while in transit, and we are sure that example.com is actually example.com. An attacker cannot simply poison your DNS cache, and redirect example.com to their own evil server. There are ways to do this, however it involves hacking the CA and getting the private keys - or when trusted CA's go rogue such as this situation, where China's CA was removed from the Google and Mozilla root certificate store for impersonating Google.com. I digress - you should go and readup on the different styles of circumventing TLS as an attacker to gain a deeper understanding of what's going on. The rabbit hole is endless - follow it for a while and you could well find yourself being a professional cryptanalyst for a secret Govt. Agency or something. Alright - back to business now. We need to protect our super-secret information from the public internet. Let's get to the client side certificates.
Client side
First off we are going to need to become our own Certificate Authority so that we can sign our own certificates. We can use another CA for this, however there will be certain (non-technical) processes to make this happen. So for the purpose of this article, we will be our own CA - you'll also understand openssl better. Right - we need openssl. Go download it. Use the package manager, it's easier, however if you're hardcore and want to compile everything from source - then please go do it. Before proceeding you should see something like this:
$ openssl version
OpenSSL 1.1.1n  15 Mar 2022
Let's go:
$ openssl req \
  -newkey rsa:4096 \
  -x509 \
  -keyout ca.key \
  -out ca.crt \
  -days 30 \
  -nodes \
  -subj "/CN=my_ca"
Alter your 'days' and 'subj' to suit your preferences. A 30 day validity on this CA means that all certificates signed by this chain will expire after 30 days. Not the best idea, however there are use cases for this as well. If you have any doubts about the above command, I'd encourage you to read the 'man' pages and the openssl documentation.
The output of the above command should leave you with two files. ca.key and ca.crt. Keep the key safe. If anyone else gets the key, they can pretend to be you and distribute certificates on behalf of you and this whole article becomes pointless.
Next, we need to generate the client certificates. For that we need to create a 'certificate signing request' and then generate the cilent certificate and key using the certificate signing request.
$ openssl req \
  -newkey rsa:4096 \
  -keyout client.key \
  -out client.csr \
  -nodes \
  -days 30 \
  -subj "/CN=client"


$ openssl x509 \
  -req \
  -in client.csr \
  -out client.crt \
  -CA ca.crt \
  -CAkey ca.key \
  -CAcreateserial \
  -days 30
Once again, please read the docs and the manual to understand the above commands.
Ok we've got everything you need to get the show on the road.
Adding client authentication to nginx config
You're going to need to move only the ca.crt file to the server, in a location of your choice. The following lines should go into the nginx config file.
    ssl_client_certificate /etc/nginx/client_certs/ca.crt;
    ssl_verify_client optional;
    ssl_verify_depth 2
The above will return a boolean everytime a client certificate comes with a request. Now it's up to us to use that boolean value to lock down a particular location block, or the entire server block if we require. We can do it as such
    location / {
        if ($ssl_client_verify != SUCCESS) { return 403; }
        try_files $uri $uri/ =404;
    }
Finally, your config should look something like this
server {

    server_name example.com www.example.com;
    location / {
        if ($ssl_client_verify != SUCCESS) { return 403; }
        try_files $uri $uri/ =404;
    }


    listen [::]:443 ssl; # managed by Certbot
    listen 443 ssl; # managed by Certbot
    ssl_certificate /etc/letsencrypt/live/example.com/fullchain.pem; # managed by Certbot
    ssl_certificate_key /etc/letsencrypt/live/example.com/privkey.pem; # managed by Certbot
    ssl_client_certificate /etc/nginx/client_certs/ca.crt;
    ssl_verify_client optional;
    ssl_verify_depth 2;
    include /etc/letsencrypt/options-ssl-nginx.conf; # managed by Certbot
    ssl_dhparam /etc/letsencrypt/ssl-dhparams.pem; # managed by Certbot


}


server {
    if ($host = www.example.com) {
        return 301 https://$host$request_uri;
    } # managed by Certbot


    if ($host = example.com) {
        return 301 https://$host$request_uri;
    } # managed by Certbot

#    if ($host = www.example.com) {
#        return 301 https://$host$request_uri;
#    } # managed by Certbot


    listen 80;
    listen [::]:80;

    server_name example.com www.example.com;
    return 404; # managed by Certbot
}
Keep in mind
- You can use this method to keep some location blocks publicly accessible, and some under the protection of mTLS
- The client certificate is not used to encrypt anything as such, it's only used for authentication. Encryption is still handled by the normal server side SSL flow. The two flows can be illustrated separately below
Test drive
Now you should test the nginx config and reload nginx
$ sudo nginx -t

$ sudo systemctl reload nginx
If everything went well, and you now try to access the website, either with a web browser, or with a 'curl' request, you should get a 403 Forbidden!. This is perfect
curl 'https://example.com/'
Setting up the client
From your client (where you have the client key and crt), you can now try and run
curl --cert client.crt --key client.key 'https://example.com/'
And the request should go through!!! AWESOME. You've got mTLS up and running now. Be careful with your CA key, and the client cert and key - if those get lost, then unauthorised parties may be able to access your super-secret information.
Setting up your browser
Sure, we can keep 'curl'ing on, however at some point we want to use our web browser to access this page. For a web browser, we're going to need a pkcs12 file which is essentially a container for both the 'client.crt' and 'client.key'. Then we should import this pkcs12 file into our browser.
Let's create our pkcs12 file
openssl pkcs12 -export -inkey client.key -in client.crt -out client.pkcs12
Now, in the browser, go to Settings--->Privacy & Security ----> View certificates ----> Your certificates, and import this file. When you visit the protected site, you'll be asked to choose a certificate to authenticate with - choose the right cert.
Everything should be working file
Revocation lists
Why do you need a revocation list? In the case of an enterprise, for example, if someone leaves the organisation, and you want to revoke access to the super-secret information, it would be very problematic to change the CA certificate. That would mean re-issuing new certificates to every member. A certificate revocation list is a device to simply revoke or 'blacklist' one or more certificates to tell the server, "Hey - this is not a valid certificate, return a 'FAIL' on ssl_client_verify."
A CRL is simply a text file with concatenated certificates that you want revoked. To set this up, simply create a text with the certificate that you want revoked.
$ cat client.crt >> crl.pem
and then add the following line to the nginx server block
$ ssl_crl /etc/nginx/client_certs/crl.pem;
That's it. Now when you request the same page as such
curl --cert client.crt --key client.key 'https://example.com/'
The server will return a 403 Forbidden.
Conclusion
You should now be versed in the basics of gettin mTLS up and running. If you've found any errata in this article, please bring it to my notice by dropping a comment in below. Thank you.
Theory
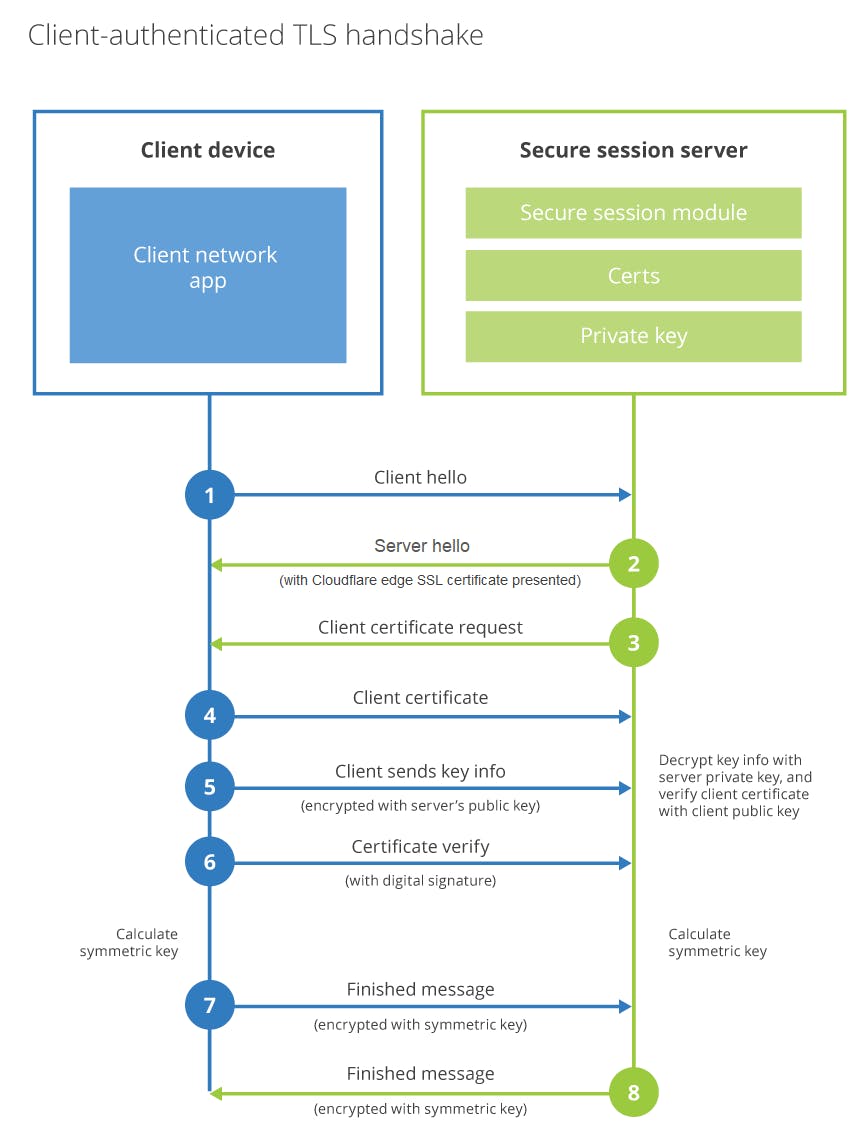 (Image courtesy Cloudflare)
The above is what you've achieved. Go read up on the theory now.
(Image courtesy Cloudflare)
The above is what you've achieved. Go read up on the theory now.